|
|||||||||||||||
|
|||||||||||||||
|
Home Page |
Buy Now! |
Shipping Information |
Frequent Questions |
Customer Testimonials |
Still Not Convinced? |
Instruction Manual |
JB-3 Story |
Register JB-3 |
Your Privacy |
Returning Merchandise |
Sales Logon |
 |
|||||
|
Figure 1 |
|||||
 |
|||||
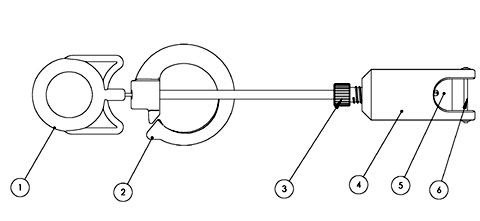
| 1. Finger Loop | 2. Belt Loop | 3. Clamping Pressure Adjustment Screw | 4. Clamp Body | 5. Clamp Plunger | 6. Clamping Bar |
Figure 2 |
|||||
|
2. Warranty: |
|
One (1) year Full Warranty: Coverage: The JB-3 Leg Bag Emptier is covered by a one (1) Year Manufacturer's Warranty. This warranty covers any failure of the JB-3 product due to manufacturing errors and/or defects. This warranty also covers any performance failure of the JB-3, when used in accordance with the supplied instructions. This warranty does not cover damages or defects relating to misuse, abuse, negligence, normal wear and tear, alterations, exposure to the elements, acts of God, improper installation, storage or handling. Any consequential damages or losses directly or indirectly related to failure of the JB-3 will NOT be covered. In no event shall our liability exceed the cost of the goods. Replacement Terms: We will, at our discretion, either repair the defect or replace the product upon receiving the failed item and determining that the failure falls within the coverage conditions expressed in this warranty. To receive in-warranty service, the defective product must be post-marked no later than the end of the warranty period. Proof of purchase (Copy of this warranty card and/or receipt) and a Return Merchandise Authorization (RMA) must accompany the product. No products will be accepted which do not have an RMA number. For an RMA number, e-mail us at support@jb-3.com along with a brief description of the defect or failure. The shipping instructions will be issued along with the RMA via e-mail. This warranty is not transferable. |
|
Set Up: |
WARNING: USE ONLY SUPPLIED AND APPROVED DRAIN TUBING FOR BEST RESULTS. THE JB-3 HAS BEEN DESIGNED TO WORK WITH MOST SOFT DRAIN TUBING; HOWEVER, IT IS ONLY WARRANTEED FOR PERFORMANCE WITH THE SUPPLIED TUBING. OTHER TUBING MAY BE THICKER WALLED AND/OR MORE RIGID IN THEIR CONSTRUCTION WHICH MAY PREVENT PROPER SEALING |
|
Cut and Attach Drain Tube: |
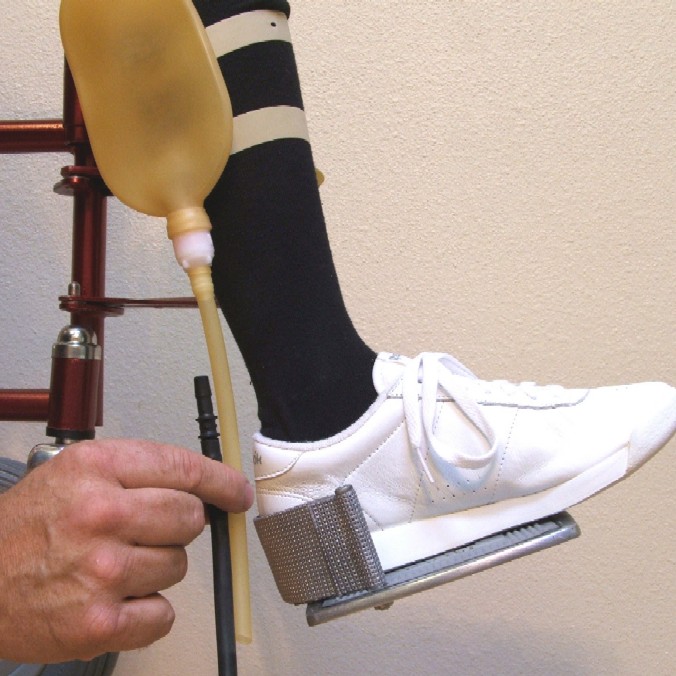 |
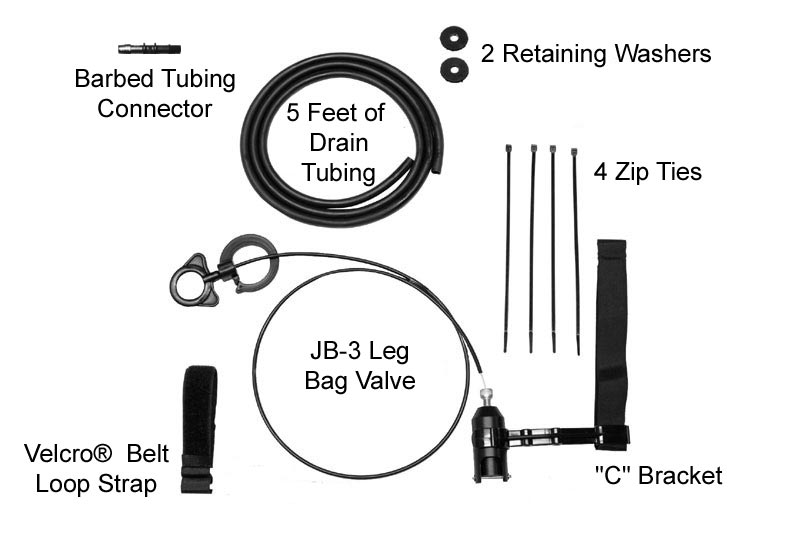
Take the Barbed Tube Connector (with black latex tubing attached) from the package and put it next to your current leg bag tubing to determine where you should cut the current tubing. Make sure that the black tubing is long enough to extend past the foot rest. You will also want to cut the current leg bag tubing so there is enough to roll onto the Barbed Tube Connector. |
|
Figure 3 (click on the picture to make it larger) |
|
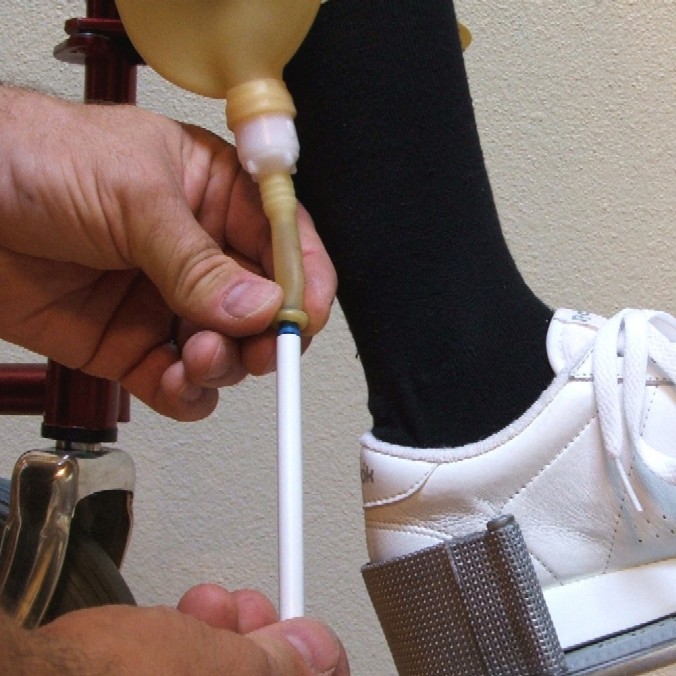 |
Attach the Barbed Connector Tube to the now-shortened leg bag tubing. An easy way to do this is by inserting a pen or pencil into the tubing about 1 inch and rolling the tubing onto itself until the pen or pencil is no longer inside the tubing.
|
|
Figure 4 (click on the picture to make it larger) |
|
 |
While holding the rolled-up tubing, place the Barbed Tube Connector up to this rolled-up tubing and unroll it onto the Barbed Tube Connector. |
|
Figure 5 (click on the picture to make it larger) |
|
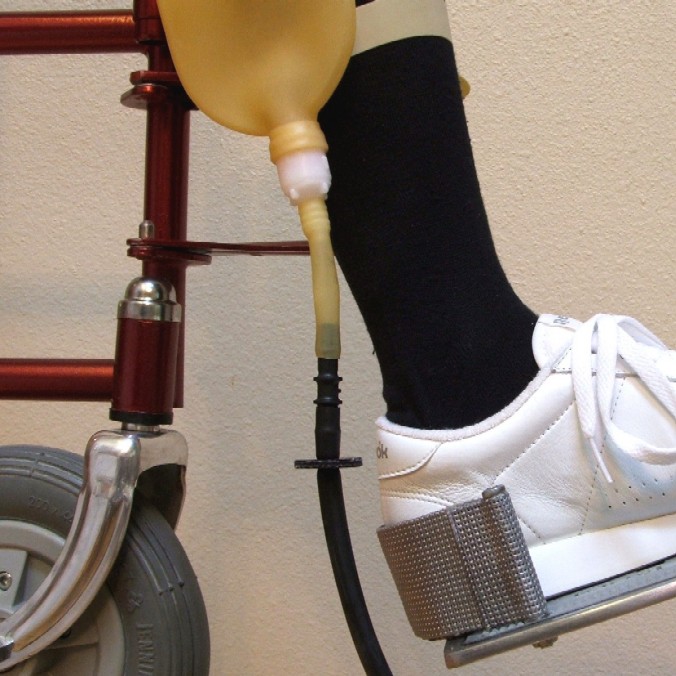 |
The drain tubing should look something like this. The first of two retaining washers should be put on now. Just put the tubing through the hole and slide it up a few inches. |
|
Figure 6 (click on the picture to make it larger) |
|
Position the JB-3 Leg Bag Valve: |
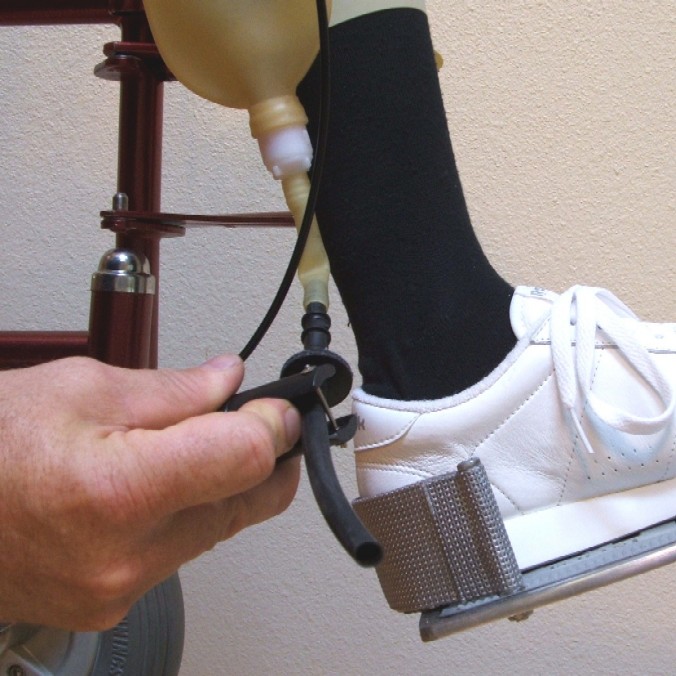 |
To install the JB-3 Valve, press on the plunger with your finger and insert the black tubing between the Clamping Bar (Figure 2, item 6) and the plunger (Figure 2, item 5). Let the plunger snap into place. Now is a good time to see if the plunger moves freely without sticking. If it does seem sticky please see the “Troubleshooting “ section to diagnose and correct the problem. Slide on the second retaining washer next. |
|
Figure 7 (click on the picture to make it larger) |
|
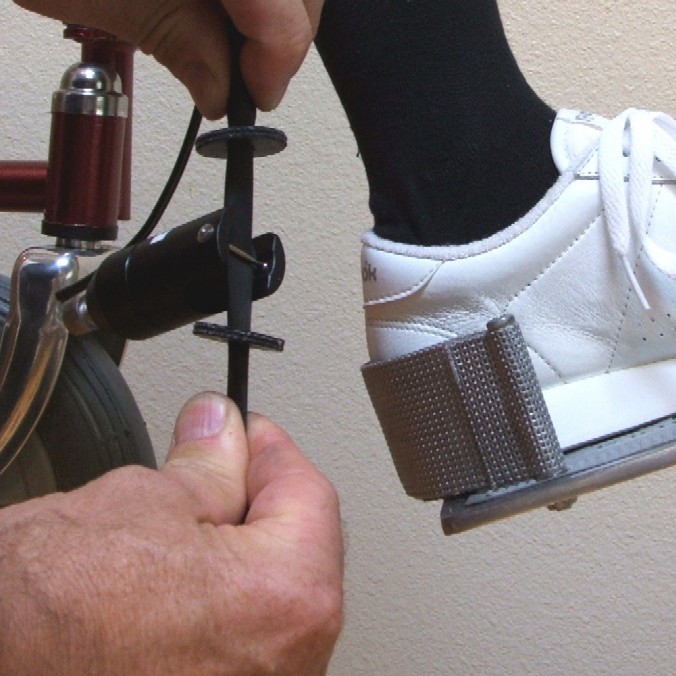 |
To remove crimping from inside the Retaining Washers and making sure that there aren’t any folds in the clamping area, stretch the tubing using both hands. This will ensure easy reliable flow of the urine. |
|
Figure 8 (click on the picture to make it larger) |
|
Position the "C" Bracket: |
 |
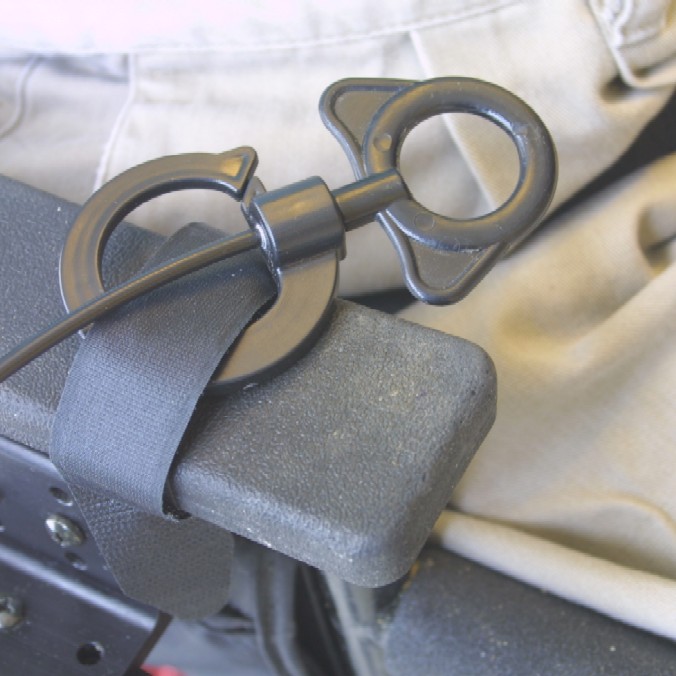
It is important when installing the “C” bracket that you slide it from the tapered end up to where it clicks into place on the groove of the JB-3 Leg Bag Valve. Removing the “C” bracket should be just the reverse. Doing it this way reduces the stress on the plastic and helps prevent the “C” bracket from breaking. |
|
Figure 9 (click on the picture to make it larger) |
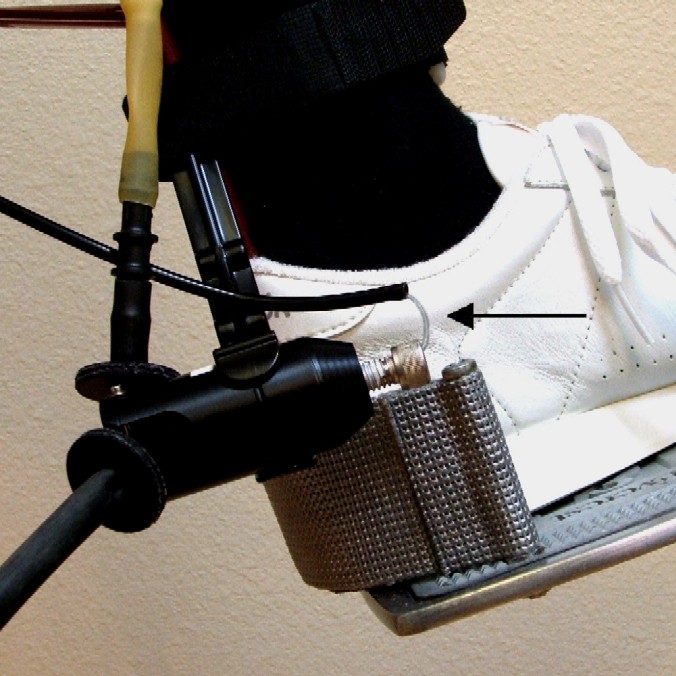 |
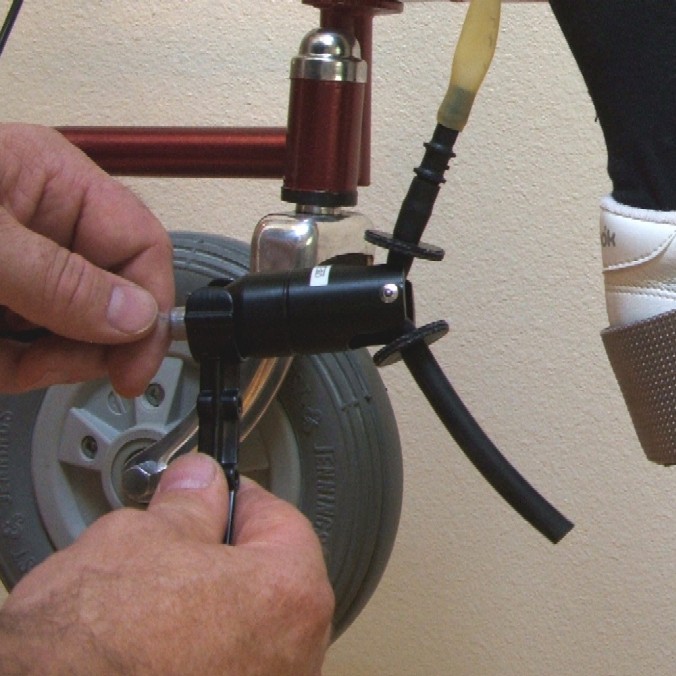
Make sure when you are positioning the JB-3 “C” bracket that the cable is not doubling back (see arrow). Re-routing the cable sheath or turning the JB-3 Valve around in the “C” Bracket should fix the problem. Don’t worry about the cable moving somewhat out of alignment. It will realign when activation occurs. The cable sheath just has to be pointing to the general direction of where the cable enters the JB-3 valve body. |
|
Figure 10 (click on the picture to make it larger) |
|
 |
A checklist for a correctly-installed JB-3: |
| 1. No tubing is kinked. | |
| 2. Cable is aligned to go into the valve. | |
| 3. Retaining washers are installed. | |
| 4. Black tubing is in position to drain without getting on foot rest. | |
| 5. Open the valve on the leg bag itself (REALLY IMPORTANT). | |
| 6. Check for dripping. | |
|
Figure 11 (click on the picture to make it larger) |
|
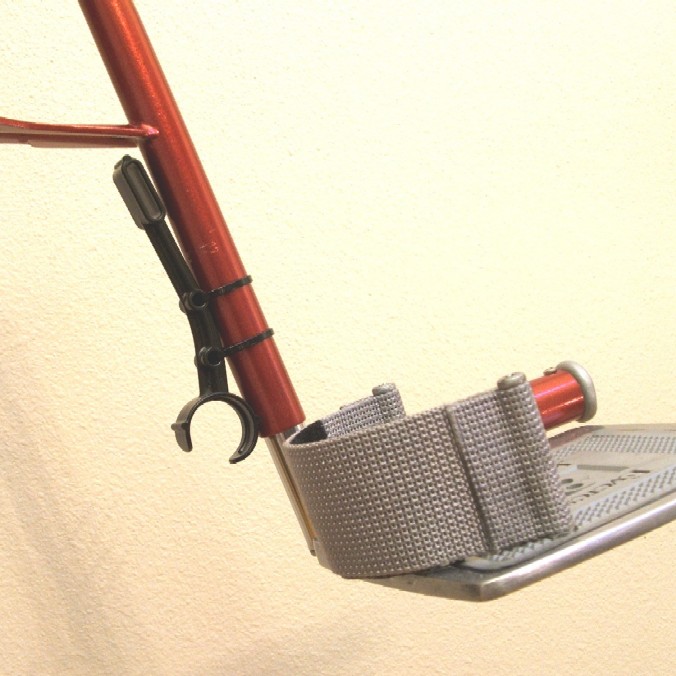 |
An alternate installation allows attaching the “C” bracket to the foot-rest strut using the supplied zip ties. No damage is done to the wheelchair and the zip ties can be easily cut for removal.
|
|
Figure 12 (click on the picture to make it larger) |
|
Position the Belt Loop: |
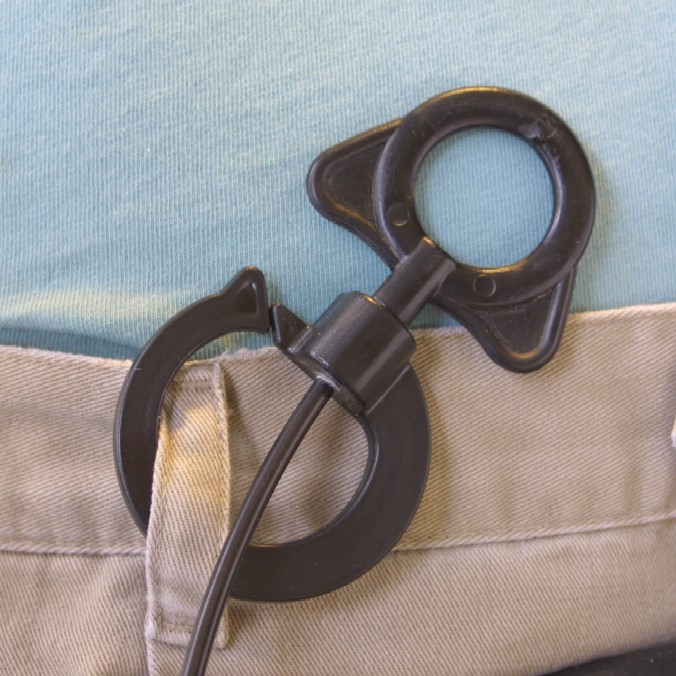 |
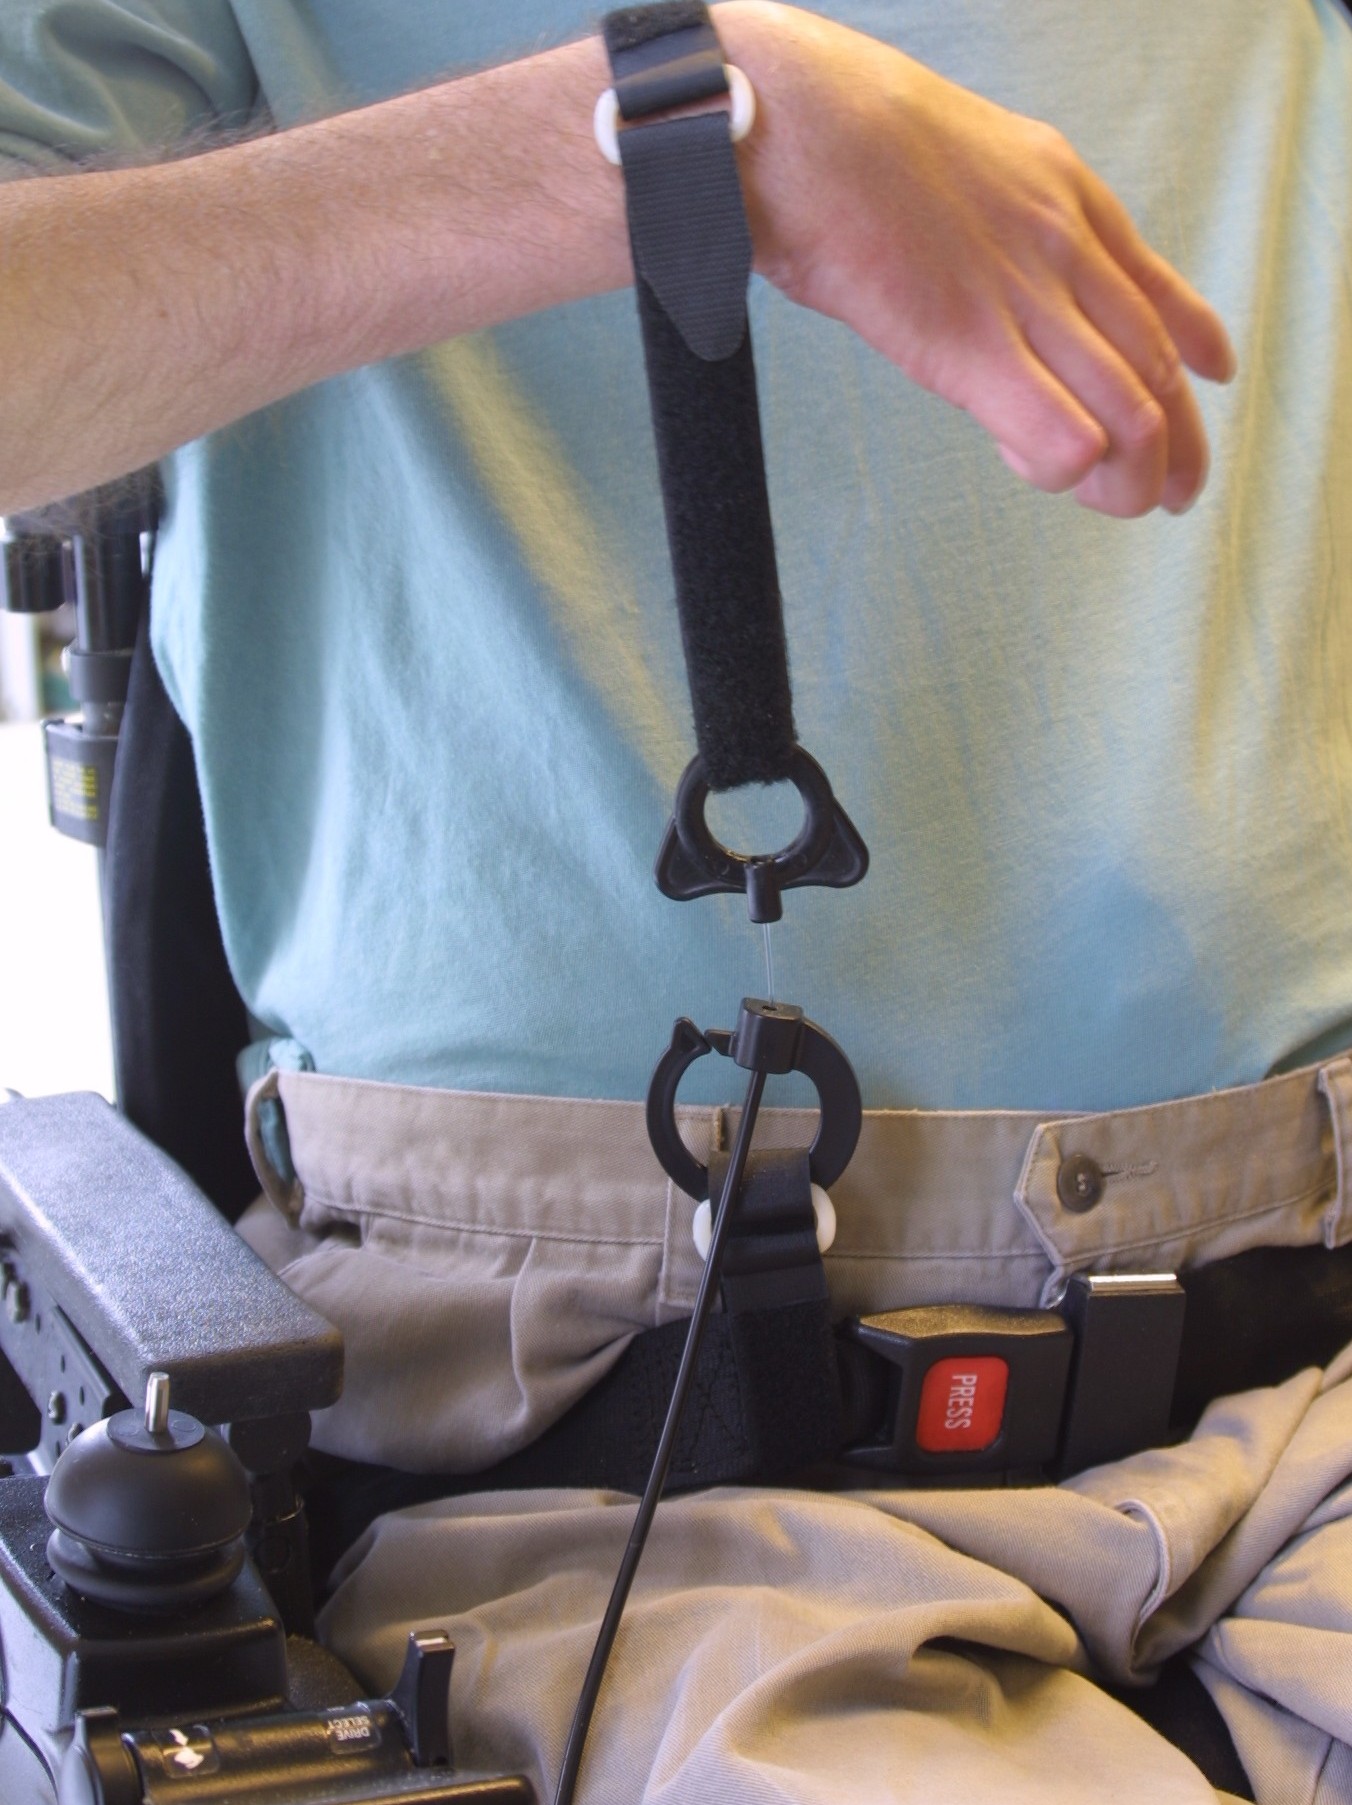
There are a number of ways in which the Belt Loop can be attached to either a wheelchair or your clothing. The Belt loop allows you to hook it to almost anything, including the loop on your pants.
|
|
Figure 13 (click on the picture to make it larger) |
|
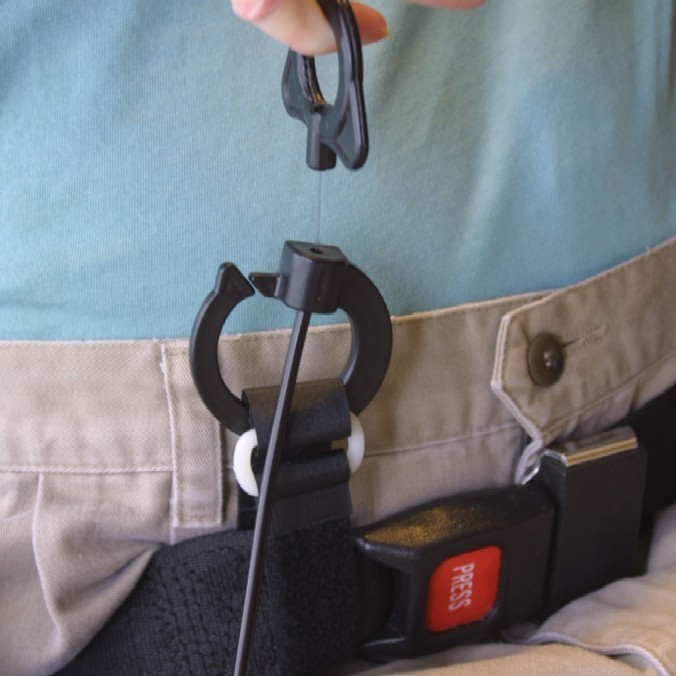 |
There are a number of ways in which the Belt Loop can be attached to either a wheelchair or your clothing. The Belt loop allows you to hook it to almost anything, including the loop on your pants.
|
|
Figure 14 (click on the picture to make it larger) |
|
 |
There are a number of ways in which the Belt Loop can be attached to either a wheelchair or your clothing. The Belt loop allows you to hook it to almost anything, including the loop on your pants.
|
|
Figure 15 (click on the picture to make it larger) |
|
How to void your leg bag: |
|
Position the drain tube over an appropriate receptacle and pull on the finger loop with light pressure. The JB-3 is designed to empty a 750 ml. leg bag in under 30 seconds with less than 2 lbs. of pulling force. Let a small amount of urine drain, then release the finger loop. Wait 30 seconds. If no urine drips, then everything is correctly installed. There may be 1 drip after you release the finger loop. This is normal as residual urine is draining from the drain tube beyond the clamp. Several drips in 30 seconds means there are adjustments that need to be made. Go to the Troubleshooting section to determine what to do next. It is best to try this testing procedure 2 to 3 times to make sure there are no problems when you first install the JB-3. |
|
Adjust Clamping Force (If Necessary): |
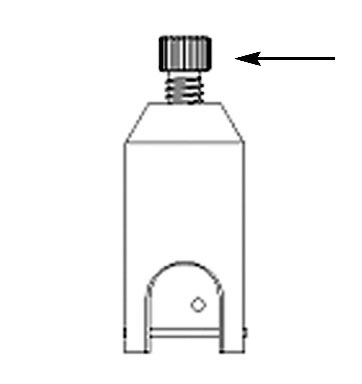 |
Caution: Even though the clamping force is fully adjustable by the user, the clamp has been set at the factory to be at the ideal clamping force for the supplied drain tubing. No initial adjustment should be necessary. The clamp has been designed to be adjustable so that it can be tightened in case of drain tubing wear or excessive motion of the wheelchair (i.e., frequent tilting, movement over uneven surfaces, etc.) Alternatively, unscrewing the adjustment screw will make the Finger Loop easier to pull. This lowers the clamping force and should be done only with the factory-supplied tubing. The adjustment screw is not intended to take up slack in the black cable sheath. The cable sheath is cut much shorter than the cable to allow about 1 inch of movement before activating the valve. This prevents accidental emptying if the Finger Loop is tugged on, or there is movement by the person wearing the JB-3. |
|
Figure 17 |
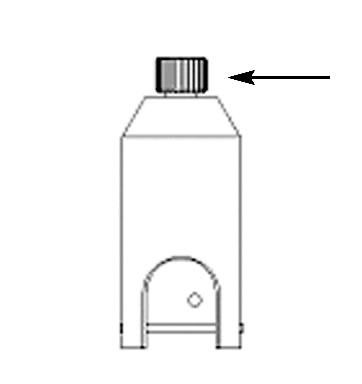 |
Figure 17 shows how the JB-3 adjustment screw looks when it is in the approximate factory setting, while Figure 18 shows how the JB-3 adjustment screw looks when maximum clamping pressure is required. The clamp can be made easier to activate by unscrewing, or can be made to clamp harder by tightening the screw: Adjust in 1/2 turn increments and test for leaking. When making adjustments it is best to put a receptacle under the drain tube to catch any drippings. NOTE: IN THE EVENT OF UNFORESEEN ISSUES WITH USING THE FINGER LOOP TO ACTIVATE THE CLAMP, PRESSING THE PLUNGER BACK WITH ONE’S FINGER CAN VOID THE LEG BAG. NEVER USE TOOLS AS THEY MAY DAMAGE THE CLAMP OR THE PLUNGER. |
|
Figure 18 |
|
Helpful Tips: |
|
1. Your JB-3 requires almost no maintenance. A periodic cleaning of the clamp mechanism in warm soapy water is all that is needed to keep the clamp functioning properly. See “Cleaning the JB-3 Valve” in the Trouble Shooting section. 2. The only adjustment required is to the clamping force by use of the adjustment screw as outlined on page 10. If there is still dripping after tightening the adjustment screw 2 full turns, then there is something else wrong that is causing the dripping and you should refer to the Troubleshooting Section 3. Often a simple slight pull of the drain tubing to straighten and align it in the clamp is all that is required to stop minor leaks. For other performance issues, please refer to Trouble Shooting section. 4. The JB-3 is made of Delrin, polycarbonate, nylon, and stainless steel. The plastics were chosen for their lightweight and chemical resistance properties. Be very careful not to damage the plastic components of your JB-3. Screwdrivers or pliers can mar or damage the plastic components and lead to failures. 5. Do not put the black cable sheath under the seat or in other places where it may get crushed or severely bent. If the sheath is crushed, it will bind and lead to resistance when being activated and leaking when released. 6. Make sure the black latex tubing is not crimped above the JB-3. Crimping can cause a significant increase in the time it takes to drain your bag. 7. To prevent accidental breakage, please don’t force the Belt loop onto objects wider than ¼ of an inch. If you need to attach the belt loop around objects that are thicker than ¼ of an inch, like part of your wheelchair frame, use the supplied Velcro® strap to wrap around the wheelchair frame then slip the Belt Loop onto the strap. Refer to Figures 15 and 16. 8. To help prevent the “C” Bracket from breaking, it is best to slip the “C” Bracket onto the JB-3 Valve Body from the tapered end, and then slide it up until it clicks into place. To remove the “C” Bracket, reverse the procedure. This eliminates excessive spreading of the plastic.
|
|
More Methods to Assist in Activation: |
|
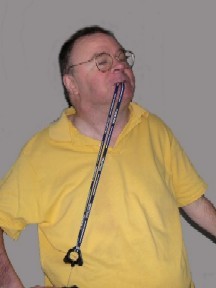
Attaching other grips to the Finger Loop will customize it to for each user’s needs. This person attached the JB-3 “C” Bracket with the zip ties provided. This left the Velcro® ankle strap to be used as an easy way to activate the JB-3 or you can use a camera strap as seen in figure 20. Sometimes using both arms may be necessary or pulling with neck and jaw muscles. |
|
 |
 |
|
Figure 19 |
Figure 20
|
|
Trouble Shooting: |
Finger Loop is harder to pull than usual—
1. Inspect black cable sheath to ensure it is not caught in your wheelchair or damaged by being crushed or crimped. If it is hard to tell if there is binding, then remove the JB-3 unit from the wheelchair. The outer black cable sheath should slide easily along the cable
2. Check to make sure that the JB-3 plunger (Figure 2, Item 5) does not bind, by pressing on it with your finger. If there is binding, clean the JB-3 Valve as described in “Cleaning the JB-3 Leg Bag Valve” below.
3. Make sure the cable is not doubled back on itself. See Figure 10 for picture and more complete explanation. If it is doubling back, reposition the cable sheath or turn the JB-3 valve around in the “C” bracket to correct the alignment.
Dripping—
1. Check to make sure that the JB-3 plunger (Figure 2, Item 5) does not bind just prior to it pressing against the clamping bar (Figure 2, item 6). To do this, remove the drain hose from the JB-3 and see if there is any light that is visible between the bar and the plunger when the JB-3 is in the ‘pinched’ position. If there is light between the two, follow the process “Plunger doesn’t clamp hard enough,” If that process doesn’t work, then follow the process “Cleaning the JB-3 Leg Bag Valve.”
2. Check to make sure clamping bar is securely in place (Figure 2, item 6).
3. Make sure the cable is not doubled back on itself. See Figure 10 for picture and more complete explanation. If it is doubling back, reposition the cable sheath or turn the JB-3 valve around in the “C” bracket to correct the alignment.
4. If leaking persists after all steps above are taken, then adjust the clamping force. To increase clamping force, tighten the adjustment screw 1/2 turn at a time until leaking stops. You should not have to increase the adjustment more than 2 full turns. If you do increase it more than 2 turns from the factory setting, you may damage the JB-3 cable by over stressing it when you are activating it. See page 10 for more information.
Urine takes a long time to drain—
1 Check the tubing between the leg bag and the JB-3 Valve for crimping. Using the “C” bracket usually assists in preventing this from happening because it prevents the JB-3 Valve from moving into extraordinary positions causing crimping of the drain hose or severe misalignment of the cable sheath.
2 Also make sure that the petcock or twist valve on the leg bag itself is fully opened.
3 Finally, make sure there isn’t a crimp inside the retaining washer. If there is a crimp in the retaining washer, remove the crimp as shown in Figure 8.
Plunger doesn’t clamp hard enough—
The JB-3 valve body may have been stepped on or otherwise crushed where the clamping bar is attached (Figure 2 item 6). This will deform the JB-3 valve out of its precision tolerances. Gently spread apart the area where the clamping bar is attached using only your hands/fingers. It should not take a lot of force to allow for proper tolerances to be re-established. Do not use any tools as this may damage the valve further.
Cleaning the JB-3 Leg Bag Valve —
DO NOT PUT YOUR JB-3 INTO THE DISHWASHER OR WASHING MACHINE!
Remove the adjustment screw (Figure 2, Item 3) and soak the valve in warm soapy water. Pressing the plunger with your finger multiple times while it is under water will assist in flushing the dirt out. Dry thoroughly and spray the inside of the valve with a small amount of WD-40® (if available). This will help to drive out any moisture remaining in the valve. Lubrication is not required. Install the adjustment screw, and screw it in as far as it will go. Then unscrew it 5 complete turns. This will put the JB-3 in the approximate factory setting as shown in Figure 17 . Follow the instructions on page 10 (Adjust Clamping Force) for further adjustments.
|
JB-3.COM 23702 3rd Pl W Bothell, WA 98021-8693 |
|
JB-3.Com a
division of EclecTec Innovations LLC - Easy Leg Bag Emptying Without
Electricity - |